With all collision boxes setup, we can go now on creating and adding LOD to models.
LOD, Level Of Detail is strong feature of Serious Engine. As model is in distance from viewer less detail on it is actually seen so those details dont need to be drawn and have impact on Engine's performance i.e. if model have teeth modeled (with many polygons) and its far away from viewer those teeth looks like few pixels on screen and they can be removed.
MipModels are created in 3d application or by using Automatical mip modeling tool in Serious Modeler. Mipmodels once imported and added are saved inside model, there is no need for extra models representing mips. When making mipmodels in 3d apllication, you have more control in removing vertices and polygons. However there are few rules in creation of mipmodels (although they might look like limitation, they help maintaining filesize smaller and rendering faster).
1) When making mipmodels, vertices on model must not be moved or added, they only can be deleted.
2) In mipmodels polygons can be retripled and new added, but adding new surfaces isnt allowed (it will be ignored).
3) Serious Modeler recalculates mapping on mipmodels, based on main model's mapping, there is no need to adjust mapping in mipmodels.
Depending on model's polygon count, choose number of mipmodels (up to 32). For this model we will make 5 mipmodels (with 0th, highest polygon count it will be 6).
Removing polygons/vertices in mipmodels doesnt need to be linear, if 0th mipmodel have 1000 triangles, make 1st with 900, 2nd with 650, 3rd with 350, 4th with 200 and last with 60 or less triangles.
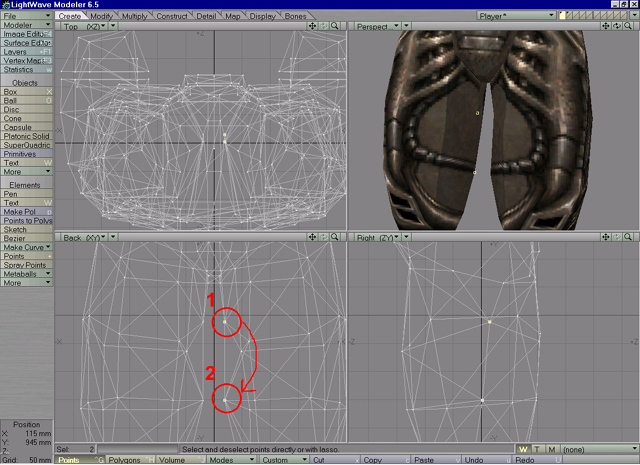
Load player.lwo in Lightwave Modeler. Observe object, try zooming out and determine which polygons/vertices can be removed for 1st mip. Its good practice to leave vertices needed for good looking animations, in many mipmodels as possible, like elbow joints, knee caps, feet.. and remove those vertices that are rather decorative (buckle on vaist, fingers on hands...). For legs, i decided to remove vertices on thighs and on heel, beltbuckle... Zoom into thigh, select vertex numbered 1, then select vertex numbered 2 and press CTRL W to weld those points (Image58).
|
| Image 58 |
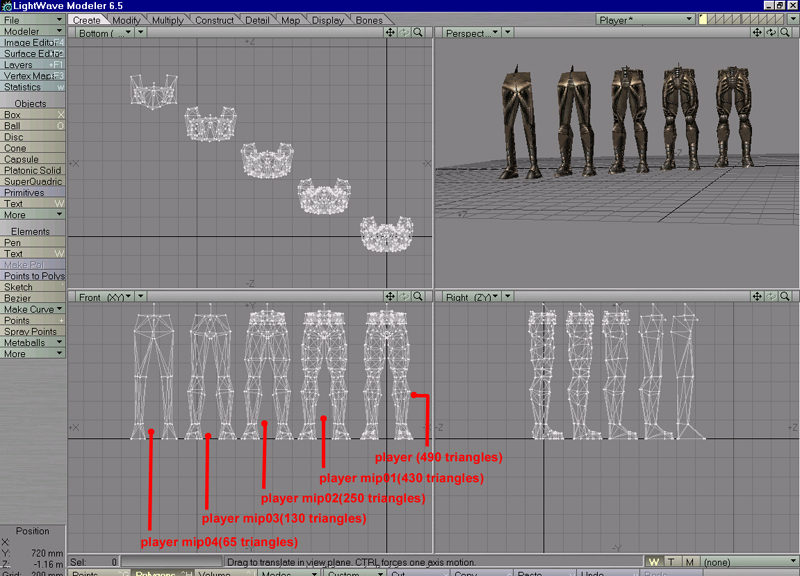
Repeat that for other leg. Weld few more unneccesary points. In statistic panel (w) select all polygons with 2 vertices and delete them (otherwise you will be prompted with error message when importing those mipmodels in Serious Modeler). Save this object as player_mip01.lwo or something meaningfull. Create other mip models from mip01 and save them as mip02, mip03... On Image59 player object and its mipmodels are shown.
 |
| Image 59 |
Note: There are plugins, available for Lightwave, suitable for creating mipmodels, like PolygonEater, Decimate, Polygon cruncher and other. All those plugins will do very good job, but from personal expirience, best way to create them is to manualy weld and merge vertices, you will have more control over removing.
Load Player model in Serious Modeler and open script. Examine section titled Mip Models:
;******* Mip models
DIRECTORY Models\Tutorials\Tutorial01\Player\StainlessSteve\
MIP_MODELS 1
    Body.lwo
When ever you create model 1 mipmodel will be added. Its created from object model is created from. You need to tell Modeler how many mipmodels there will be. Change value MIP_MODELS value from 1 to number of mipmodels you created+1 (0th). Under Body.lwo line type in names of mipmodels. After editing, script should look like this:
;******* Mip models
DIRECTORY Models\Tutorials\Tutorial01\Player\StainlessSteve\
MIP_MODELS 5
    Player.lwo
    Player_Mip01.lwo
    Player_Mip02.lwo
    Player_Mip03.lwo
    Player_Mip04.lwo
Save script and recreate model. After few secs, model will be ready. Save model. If you examined size of model before and after adding mipmodels, you will notice that model is bigger now. Adding many mipmodels will speed up rendering but can have impact on memory. Balance well, remove mipmodels, rearange polygon count until you are satisfied.
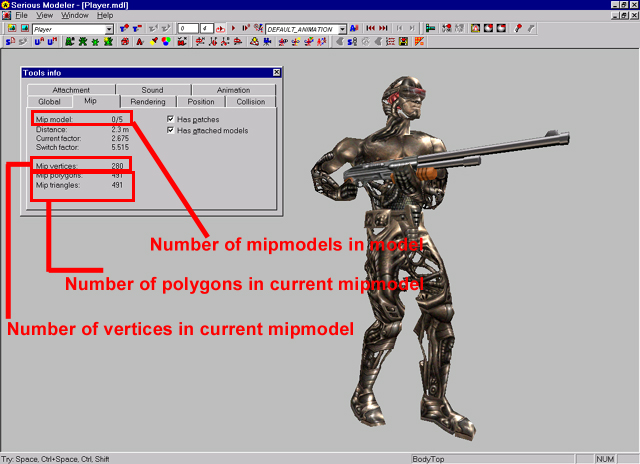
Open Tools panel and select Mip Tab (Image60).
 |
| Image 60 |
Number of usefull information can be found in that tab. It will also be used as guide when adjusting mipswitching distances.
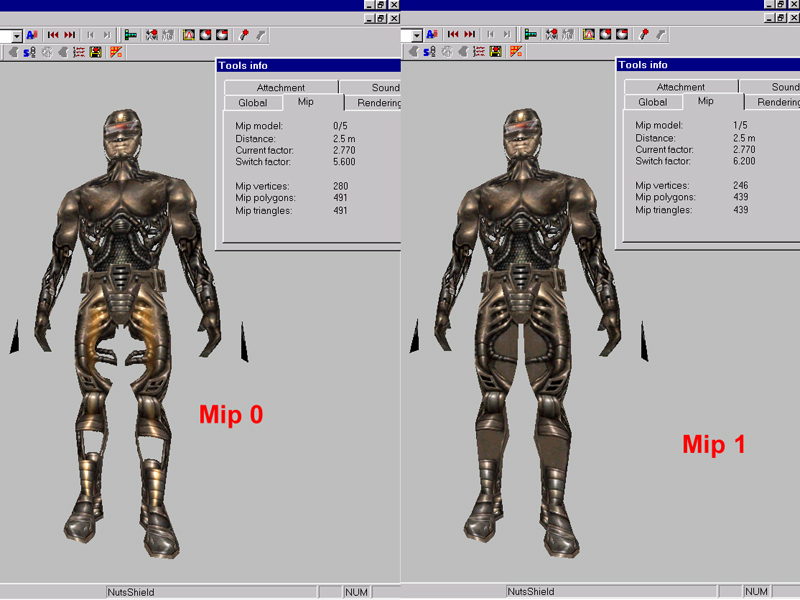
Press o shortcut to acess manual mipswitching mode. Use [ and ] to cycle thru mipmodels we added. Note how values in Mip tab change and how mipmodels have effect on global model look.
All we have to do now is to adjust mipswitching distances. Its distance from view when model switch from more to less polygons or viceversa.
Hold CTRL SHIFT RMB and move mouse up. Watch Distance value in Mip tab and when it reaches 10 meters release RMB. We have created 1st mipswitch. Press Backspace to reset model's position, press SPACE RMB and move mouse up. When Distance reaches 10 meters, mipmodel will switch. Thats how it will behave in game, when model is 10 meters from viewer it will be in 1st mip. Hold CTRL SHIFT RMB and move mouse up again until Distance value is 18 meters. We created 2nd mip. Repeat this for 3rd (35 meters), and 4th mip (90 meters). Last (5th) mip should be visible from distance of 90 meters to 1000 meters. Since its mip with lowest polygon count, it wont have high impact on rendering. 5th mip is last one, after 1000 meters, model wont be seen at all. Play with mip switching distances and look its impact on rendering in game.
The reason we added mipmodels as last part is when you recreate model to add mipmodels, surface properties and mipswitching distances are reset or not inherited. We added specular and transparency when we created player model. Those parameters arent saved in mipmodels (Image61a).
 |
| Image 61a |
To fix that we use manual mipmodels switching and Rendering panel. In rendering tab find surfaces we set specular on, and press RMB on color picker (Image62).
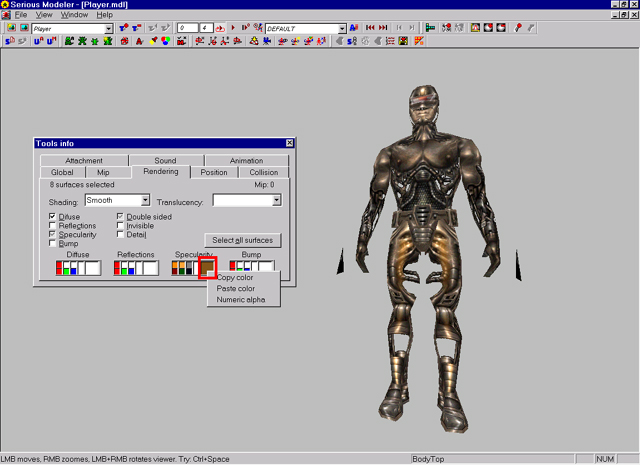 |
| Image 62 |
Select "Copy color" to copy color value into memory buffer. Press o to enter in manual mipmodel switching mode. Use [ to select next mipmodel, mipmodel number should change. Select all surfaces (using Link surfaces panel,Z) you want to edit, click on DoubleSided, select Transparent as blending mode, click on Specularity. Another thing we need to do is to paste specular color. Click with RMB on color picker bellow Specularity and select "Paste color". You should end with something like Image63. Dont forget to set attachment triangle's surface as inivisible also. Repeat this for other mipmodels.
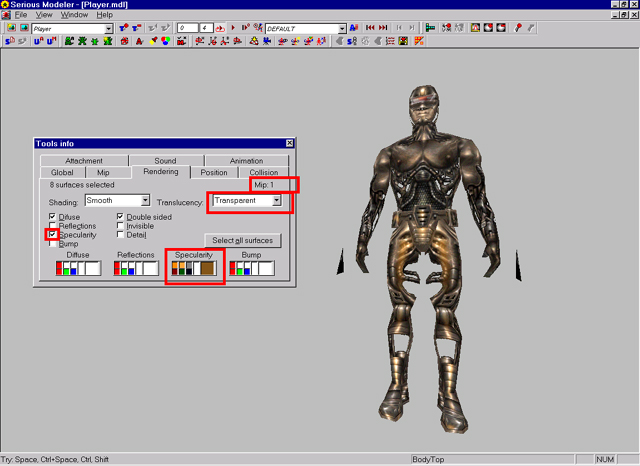 |
| Image 63 |
Note: In higher mipmodels (3rd, 4th ...) you dont have to put specular, doublesided or reflection properties. It will speed up rendering, those properties arent seen in large distances anyway.
Same as we did for player, create mipmodels for Body and Head models. When you create mips for all models, load player model and press ALT R to access global rendering options(Image61).
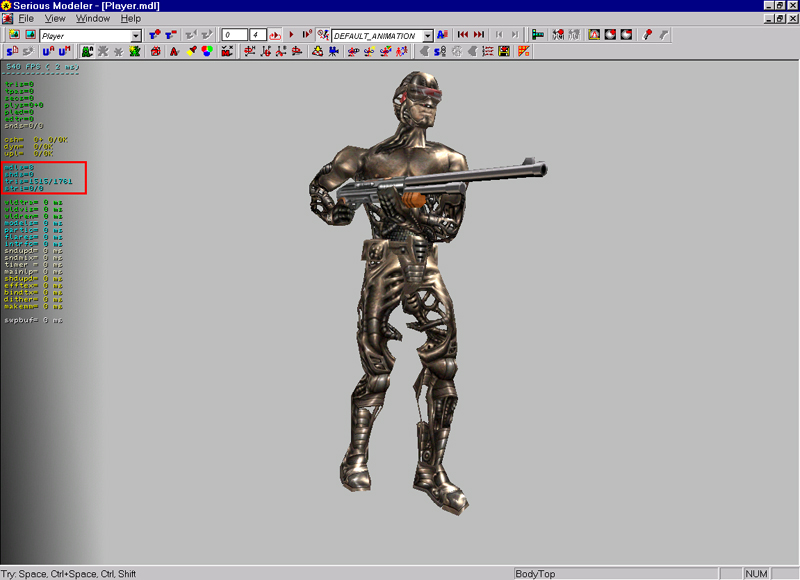 |
| Image 61 |
Bordered red are models informations, number of models, polygon count and sounds attached to that model. Press SPACE RMB and move mouse up, as model is further away, mips are switching. We are ready now to create .amc files and test our model in Serious Sam.