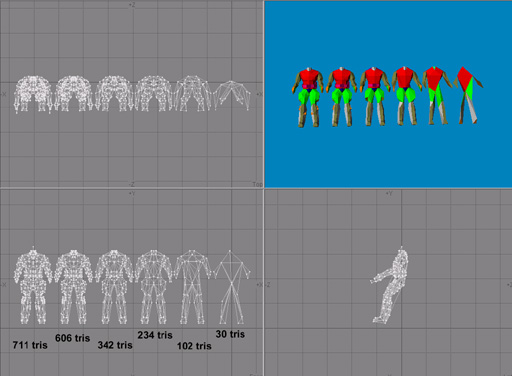
Next step is to create or add mipmodels by making them in 3d application. For Headman i created 6 mipmodels in Lightwave 3d (Figure 48).
|
| Figure 48 |
There are few rules to follow when making mipmodels manualy:
1) vertices must NOT be moved or add in lower mipmodels (ones with less geometry), vertices can only be removed. This is due way Modeler saves model to save memory.
2) polygons can be diferently tripled in mipmodels but new surfaces must not be created otherwise uw mapping wont work on those surfaces (mapping is taken from first mipmodel i.e. object you created model with).
3) When making LOD, you dont need to worry about UV data, once LOD is added to model Modeler recalculates mapping from original model.
There are no general pattern how to make efficient mipmodels, its different from model to model. Generally idea is to keep volume of model in as much mipmodels as possible and to remove first details which are not seen or hardly seen in distance (like mouth on character's head or fingers in hand).
NOTE: for Lightwave users Decimate modeler plugin is excelent tool for creating mipmodels with interactive display (search www.flay.com for it)
Back to Serious Modeler. We have 6 mipmodels created and HeadMan.lwo as 0th.
Change
MIP_MODELS 1
   HeadMan.lwo
lines in script with:
MIP_MODELS 7
     Headman.lwo
     Headman_Mip001.lwo
     Headman_Mip002.lwo
     Headman_Mip003.lwo
     Headman_Mip004.lwo
     Headman_Mip005.lwo
     Headman_Mip006.lwo
Headman.lwo <-this is object we created model from.It should ALLWAYS be 0th mipmodel. Save script, recreate model and save it. Model size is now ~300 kb so you should be careful with number of mipmodels (more mipmodels = more memory usage).
Everytime you recreate model, if manually created mipmodels are listed in script, they will be recreated with it (unlike automatic mipmodels).
For every mipmodel texture mapping settings can be tweaked from Rendering tab.
Now we will adjust distances wher models changes its mipmodels, whom Engine ill use in game. Inspect manually (press O to enable manual mipmodel switching and use [ and ] to cycle thru them) how all mipmodels look (Figure 28).
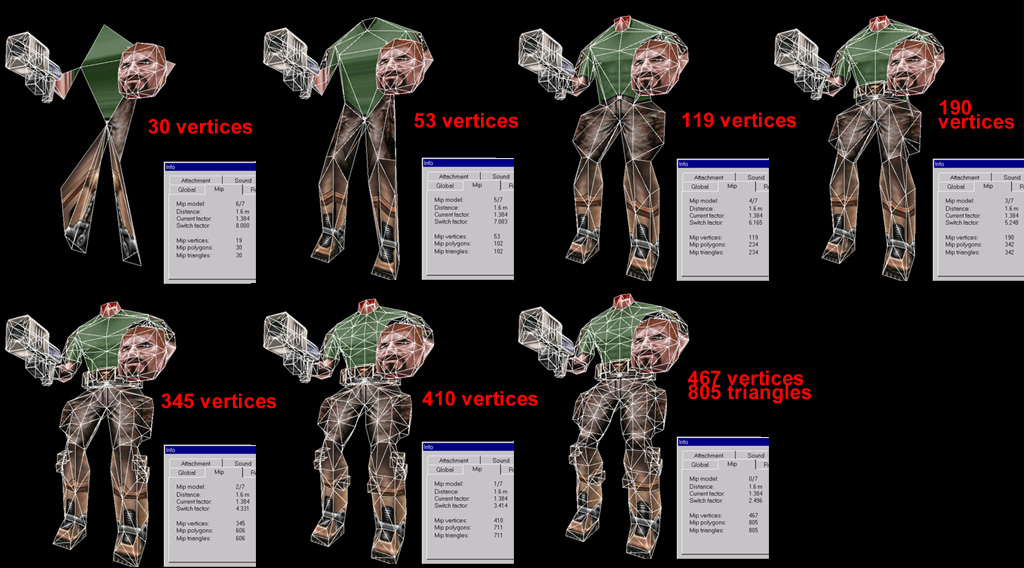 |
| Figure 28 |
Press O again to toggle automipmodeling.
Idea of mipmodeling changes is to tell Engine when to switch from higher polygon count model to one with less geometry. Serious modeler allows you to visually adjust switching, meaning that you can decide to switch to lower mipmodel when model's size is so small that details in curent mipmodel are hardly or not seen at all. To visually switch mipmodels press and hold CTLR SHIFT, click and hold RMB and move mouse up, model will zoom out and when you release RMB mipmodel will switch (check mipmodel number in menu). For Headman i decided to have 0th (highest polygon count mip for very long time and then fast change to lower mipmodels). Press and hold CTLR SHIFT, click and hold RMB move mouse up, watch Distance number in Mip tab and when its around ~30m release RMB (in that distance model is pretty small on screen and details arent seen). Press and hold CTLR SHIFT, click and hold RMB, move mouse up until distance is around 40-50 meters, release RMB and you have 2 mips added. Repeat procedure for rest mipmodels (3rd at 65m, 4th at 110m, 5th at 150m, 6th at 200 and last at 450m after wich model wont be rendered at all). Save model and press BACKSPACE to reset view. To see how we setup mipfactor, while holding SPACE and RMB move mouse up to zoom out model. Notice how mip number changes in Mip menu.
NOTE: distances in Modeler don't reflect actual distances in game if model is stretched. Mipmodels are saved directly in .mdl file and are easy accessed from engine.
NOTE 2: you can adjust mip switching factor directly in Serious Editor on per model basis.