
Note: Serious Modeler has been updated to import vast number of 3d objects with UV data directly from object. This eliminate use of unwrapped and opened objects (its still available as legacy option). For now importer has been tested with .lwo files (v1 and v2), .3ds files and .obj files (if you have any 3d format object that is supported by Serious Modeler and it doesnt load correctly please let us know).
This tutorial is addendum to Help file for Serious Modeler that you will find in Serious Tools instalation archive.
Serious Modeler now supports importing of most popular 3d object formats (.lwo (v1 and v2), .3ds , .obj among others). This tutorial will explain how to proper UV map object and import it in Serious Modeler.
Note: though screencaps are from Lightwave6.x all tehniques apply in other 3d modeling packages.
There are few rules that must be followed in order to load UV mapped object with proper mapping in Serious Modeler:
1) ALL polygons must be triangles only!
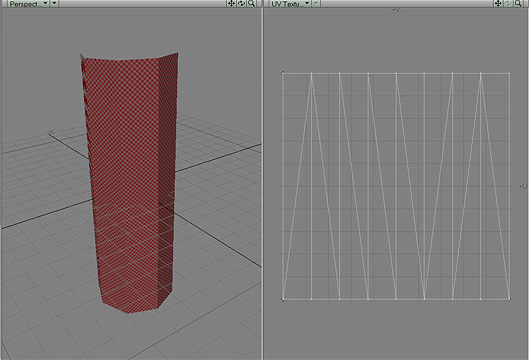
2) Material (surfaces) assigning is crucial in order to maping import properly. Take a look at Image01, its 8-sided cylindar with top and bottom polygons removed.
|
||
| Image 01 |
||
If you would assign UV map to it, you would probably use Cylindrical mapping on Y axes (in Lightwave ).
Image02 shows that cylindar with single surface (material) UV maped.
 |
||
| Image 02 |
||
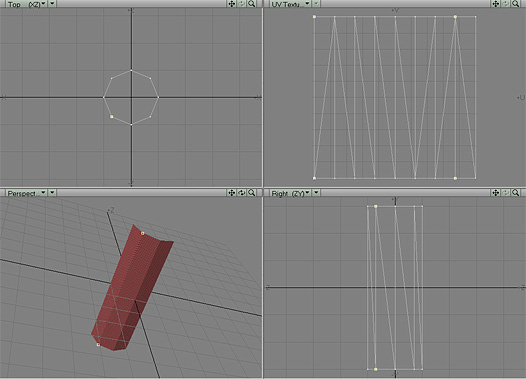
Only one surface (material) is assigned to cylindar and it have single seam in mapping. All cool you might think ? Well not exactly, though it looks ok in your favourite 3d program, it wont import correctly in Serious Modeler. Reason is that this way you have 1 geometry vertex with more than 1 coordinate in UV map, i.e. there are more 2 texture coordinates in surface with same UV value attached to single geometry vertex. (Image03 shows those vertices on mapping seam, in this case there are 2 pairs of vertices with same value).
 |
||
| Image 03 |
||
Solution is to have 2 surfaces (materials) assigned to cylindar where seam is created (place where texture coordinates are detached). Assign another surface to cylindar on seam like on Image04, this way there wont be single surface(material) with more than 1 geometry vertex with more than 1 UV coordinate in mapping.
 |
||
| Image 04 |
||
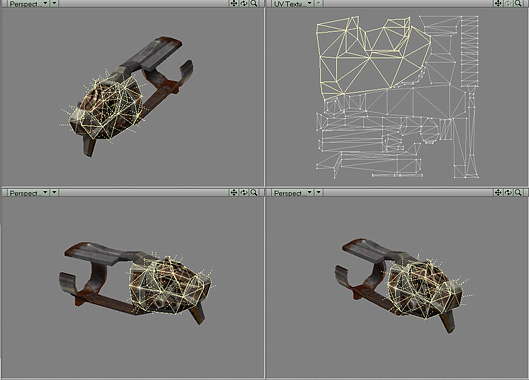
This kind of problems can occur when mapping for example character arm (wich is basically deformed cylindar), solution is to assign 2 surfaces (materials) to arm polygons and make seam on back of arm (Image05 shows 2 surfaces on arm part of object with seam on selected yellow points on back of arm, where its less visible).
 |
||
| Image 05 |
||
Same rule applies on any part of object that have closed shape (legs, head.....).
3) Object must have single UV map.
4) Use low count of surfaces(materials names) as possible (will speed up OpenGL performance in OpenGL).
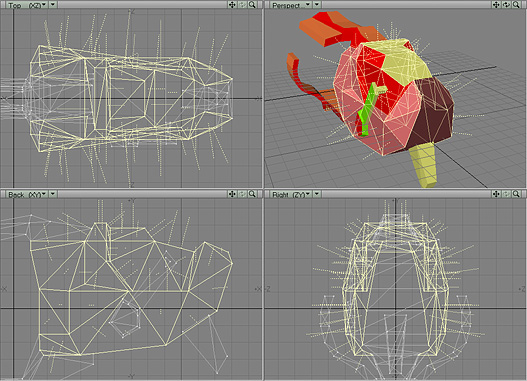
Now when all is clear, lets get going. For this part of tutorial i will use Rocket launcher i modeled for Serious Sam. Image06 shows object loaded and surfaced.
 |
||
| Image 06 |
||
As you noticed same surfacing rule was applied on this model as noted under rule 2. Since object is modeled symetrical on sides, it will be mapped symetrical. While mapping you can add as many surfaces or only one for easy mapping and then when finished mapping reduce that number to some normal count (yes Dean, i lessened surface count on Rocket Launcher :P). Since this object is used as weapon player will hold in first person view, some parts of it will be more closer to view than others. Its good practice to create rough shape of model without mapping and load it in game, position it in position it will be to see what parts of it will be more visible and then give those parts more space in maping so more details can be added to it. Same applies in modeling (more detail in places that will be seen most of time). In case of Rocket Launcher selected polygons on Image06a are seen closer than others so they are mapped to ocupy more space on texture.
 |
||
| Image 06a |
||
Planing ahead will spare you extra time adjusting and correcting model and mapping. When giving names to surfaces (materials) use name that have meaning like BodySides, Handle or similar instead of 01, aaaaaa etc... it will make skinner's life easy and he/she will be your best friend forever. Another thing to watch, since Serious Modeler allows different texture blending modes on surfaces (materials), like alpha transparent teeth on monster's head, while rest is opaque texture, you need to create surfaces for parts of object that will have different texture blending. Same thing applies if you want selective reflections, specular or bump textures. Selective (surface based) properties of Serious Modeler allows you for example to have shiny reflective metal on shotgun (with chrome reflection) while having old wood on handles. This way you dont have to add reflections, specular to whole model and slow down rendering, you can just assign those properties to surfaces that are visible from certain view. Plan ahead how will model look and surface it accordingly!
Usually when dealing with characters, weapons and similar models they will be mapped symetricaly. i.e. character's left part of torso will have same texture as right (this way texture isnt wasted and more details can be added to model's texture while keeping texture size small). When in such situation, delete either left or right part of object, map it and then mirror it (this way you are dealing with smaller polygon count when maping and mapping will be 100% symetrical).
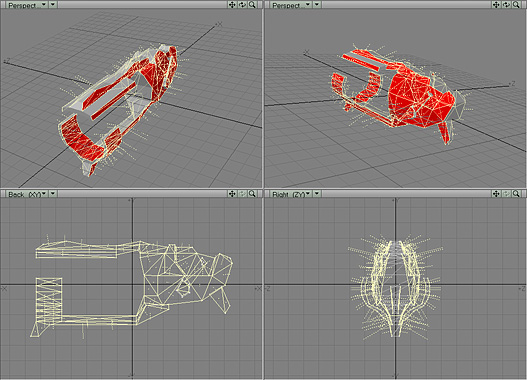
Grouping polygons in global surfaces will keep surfaces count smaller. For example if you dont need different properties on surfaces you can select all polygons that represent sides of Rocket Launcher and call it "Side" surface (Image06b).
 |
||
| Image 06b |
||
Same goes for polygons on either top or bottom of object. This way you wont be able to resize individual polygons in object to have more space in maping (without affecting sourounding polygon's mapping) but you will have less surfaces in object. Remember rule 2 about closed shapes and need to have at least 2 surfaces for maping to be imported properly. Image06c shows part of RocketLauncher maped with 2 surfaces that will load correctly in Serious Modeler.
 |
||
| Image 06c |
||
Another good tip is when unwrapping object if its symetrically mapped like on Image06d, is to know will weapon (in this case) be holded on right side or left side on screen.
 |
||
| Image 06d |
||
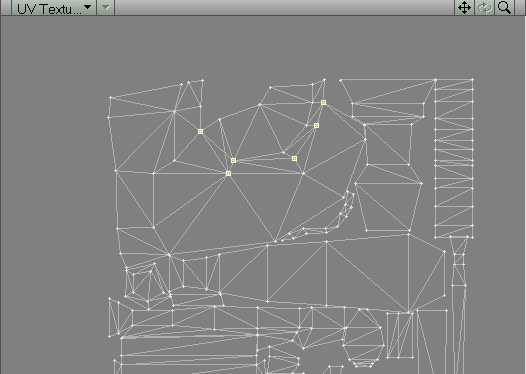
If weapon is on right side of screen (usually in FPS games), there is big chance that right side of weapon wont be seen, position polygons in mapping that seam created is on right side of weapon. Image06e shows points on left side of object that are positioned so there is no seam in mapping between parts of object.
 |
||
| Image 06e |
||
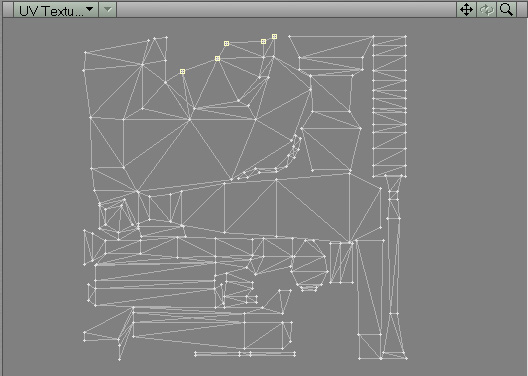
Image06f shows points on right side object that create seam and might not align perfectly when texture is created, but they wont be seen anyway).
 |
||
| Image 06f |
||
When finished with modeling and mapping, try adjusting lighting in your 3d application similar to in game atmosphere. This way you can check does object need more or less details in some places. Also try mimicing smoothing options like in Engine so you can add or remove polygons where needed. Setting max smoothing angle of 180 in Lightwave equals Engine's smoothing ammount.
Good idea is when mapping object to apply checkerboard texture on it to correct stretching that might occur. Once mapped object is ready for importing in Serious Modeler.
Image07 shows UV map (right window) and mapped object with finished texture that Petar made for RocketLauncher.
 |
||
| Image 07 |
||
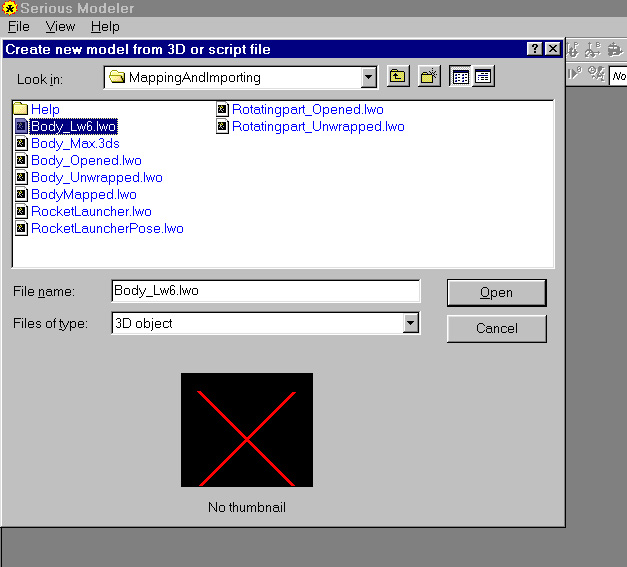
Run Serious Modeler and click on File-> New (CTRL N shortcut). Browse to folder where you did saved your object and doubleclick on it (Image08).
 |
||
| Image 08 |
||
After model is imported save it (CTRL S). When model is created from object, .scr (script) file is created in folder where object is saved (model is created with default name of object its created from).
With addition of new 3d object formats to import capabilities of Serious Modeler, new lines have been added to .scr file (for indepth explanation of script file please refer to Serious Tools Help file under Serious Modeler->Model Creation Tutorial-> Creating Models and Scripts).
Segment from new script (.scr) file when new importer is used:
By default, mapping is read from object model is created from. If there is no UV data assigned to polygons in that object,
error message will be produced.

; Old style mapping definition                                <-- Legacy maping loader for compatibility with old maping loader
                                                                                      (no longer needed, thus commented)
;DEFINE_MAPPING
;    CoolWeapon_Closed.lwo
;    CoolWeapon_Opened.lwo
;    CoolWeapon_Unwrapped.lwo
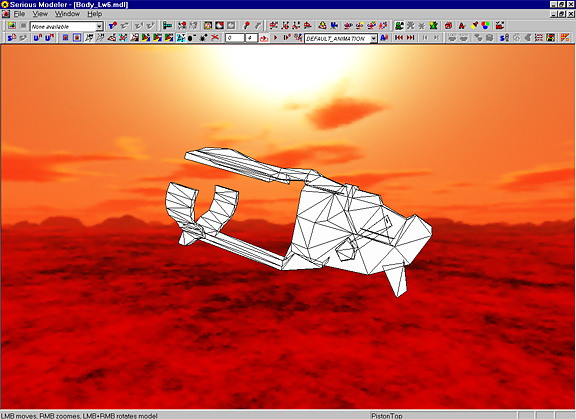
Image09 shows body of Rocket Launcher that we mapped in previous part of tutorial.
 |
||
| Image 09 |
||
By pressing "m" shortcut, so called "Mapping mode" is opened (Image10).
 |
||
| Image 10 |
||
There, imported mapping from object can be reviewed, different per surface properties can be adjusted and texture aligment on maping checked. You noticed that when model is created it was rendered white, same white box appeared bellow wireframe in Mapping mode. That is because once model is created or recreated from object, it looks for texture (.tex file, for more info on how to create .tex files check Serious Modeler Help) with same name as object its created from (Body_Lw6.tex in this case). If you want to change model's default texture name, click "m" to close Mapping mode and press "s" to edit .scr (script) file, where you can alter texture name. Script file is explained in details in Serious Tools Help file that shiped with Editor and Modeler so i wont waste space and time repeating myself.
If you happy with model and its mapping, click form File menu "Export for skinning button". It will ask you first to select name of image file in wich mapping will be exported (wireframe of mapping will be saved in image and resolution you choose). Among other options (Image11) you can choose background (paper) and wireframe (wire) color.
 |
||
| Image 11 |
||
Also wireframe can be colored accordingly to surface(material) colors you created in your 3d application. If you choose "surface numbers" option, number will be centered in every surface wich corespond to .txt file saved in folder where you choose to save mapping. All this will help skin artists to easily recognize what represents what in mapping (if you named surfaces with some meaning names).
When texture is created, it can be added to model by clicking "Add working texture" (CTRL T shortcut) or if texture with same name exists it can be recreated from image file (CTLR R shortcut).
This is all for now. Stay tuned for more....
If importing LWO files V1 (prior LW6.x version) there are few options for UV data import:
* use opened/unwrapped solution
* use UV files saved by UView or similar software. UV file with same name as object you are importing plus .uv extension must be saved in folder where is object you are importing. Same rule of closed shapes (2 surfaces) applies.
When importing LWO files V2 (generated by Lightwave6.x) mapping will be read from object itself(if exists). Same rule of closed shapes (2 surfaces) applies. Only one UV map must exist in object.
Importer supports "Discontinued mapping" feature from Lw6.5.
Known problems:
If object is saved from Lw6.5 beta 2 sometimes importer wrongly interprets UV data. Solution is to load that object in Lightwave 6.5 and resave it there.
When importing 3DS files mapping will be read from object itself (if exists).
Same rule of closed shapes (2 surfaces) applies.
Only one UV map must exist in object.
Known problems:
Layered objects (subobjects) arent yet supported by importer (only first subobject will load, thus screwing mapping and geometry). Solution is to merge object in single mesh and then import it.
When importing .OBJ files mapping will be read from .mat (material) file. Material file (with same name as object being imported) must be saved in same folder with object. Same rule of closed shapes (2 surfaces) applies.
Only one UV map must exist in object.
Known problems:
Depending on program .obj file is saved, .mtl file have wrong UV data. Solution is to use program with native .obj support or use 3rd party converter program to convert it to corect .obj (and .mtl) file.
When importing MD2 files mapping will be read from object itself (if exists). Same rule of closed shapes (2 surfaces) applies.
Only one UV map must exist in object.
When importing MD3 files mapping will be read from object itself (if exists). Same rule of closed shapes (2 surfaces) applies. Only one UV map must exist in object.
Known problems:
Layered objects (subobjects) arent yet supported by importer (only first subobject will load, thus screwing mapping and geometry). Solution is to merge object in single mesh and then import it.
Doesnt load properly. Export to .3DS rather and then import it.